See Jack Zig and Zag: Teaching Fundamental Movement Skills
/
In my previous article in this series on LTAD, See Jane Jump: Teaching Fundamental Movement Skills, I focused on the fundamental athletic position, the squat, the hinge, and jumping/landing. My focus in this article is on locomotion, or moving the body from point A to point B—and sometimes to point C. Too often, skills like running, backpedaling, shuffling, decelerating, and changing directions are not taught and coached in young athletes. And when you consider the many team sports played on the court and field, an athlete’s success can be defined by their speed and ability to change directions.
Last article focused on how to teach and coach the two-legged stance and movement. But most actions in sport require a unilateral pattern—that is, being on one leg at a time. With this in mind, I start teaching locomotor movements with the single-leg stance, or single-leg balance.
Single-Leg Stance

The single-leg stance is essentially the fundamental athletic position, but on one leg. The same rules and cues from the bilateral (two-legged) fundamental athletic position apply here: knees and hips slightly flexed, tall chest, butt out, on balls of feet, toes forward, and feet shoulder-width apart. You’ll find that some athletes might lock the knee or lose the slightly bent “soft knee” position. It’s also common to find a loss of upper body or postural control as well. Having the athlete hold onto the wall or some other fixed surface/item may be necessary until they gain confidence and motor control in this single-leg stance.
Hopping and Skipping
Once the athlete can achieve static balance on one leg, I will introduce the hop, which places them in dynamic balance. First, I’ll have the athlete hop in place with small jumps—and then progress to short hops for distance: going 1 hop on the right leg, 1 hop on the left, 2 hops right, 2 left, 3 right, 3 left, and then for 5 to 10 yards on one foot at a time. The focus should be on short-distance hops and body control.
Similar to two-footed jumping, I will also spend time emphasizing the landing phase of the hop: softly, on the ball of the foot, absorbing the energy of the hop with a flexed or bent knee. Hopping also introduces the spring-like action of the leg that is desired in sprinting as the athlete lands on the ball of the foot and minimizes the time spent in contact with the ground.
Once the athlete can hop, we progress to skipping. Skipping is simply a step and a hop. Step-hop, step-hop, etc. I often let athletes try at their own speed, but have found that I need to slow them down and think about the movement: step-hop, step-hop. Like hopping, skipping also then segues into running.
Moving Forward, Backward, and Sideways

Running is merely an extension of walking at a slightly faster pace and gait cycle. Everybody can walk and run, but are they doing so efficiently? In many team sports, there is a focus on speed. Coaches put kids on the line, blow the whistle, and yell at them to run as fast as they can (“Let’s go! Faster!”) Often, this is done with little to no instruction on efficient running form. And while a full explanation of how to teach proper sprint mechanics is beyond the scope of this article, here are my top four coaching cues.
Key Coaching Cues for Sprinting:
Stay tall (with a slight forward lean)
Good arm action (90 degrees, moving from hip pocket to chin)
Land on ball of foot
Drive the knee
Besides moving forward, athletes also backpedal and shuffle laterally during sports. To keep the backpedal simple, I cue athletes to “push the ground foward” and “reach the heel back” while keeping the “nose over the toes.” The athlete should maintain the athletic position but with a slightly more forward lean. Athletes get into trouble when they stand up and the nose goes back; when this happens, they find themselves off-balance and falling backward. How often have you seen an embarrassed kid on their butt during a backpedal drill? I always say, “Keep the nose over the toes. If the nose goes back, YOU go onto your back.”
Shuffling is also one of those movement skills that typically don’t get a lot of instruction, beyond “don’t cross your feet.” This is certainly a good cue, but we can help the athlete more with a proper progression instead of just letting them shuffle. Here is my teaching progression for shuffling (always starting and ending in the fundamental athletic position).
Teaching Progression for Shuffling:
Step to the side (right or left) and slide or pull the opposite foot toward the lead foot. Continue this sequence slowly for about 5 reps.
At a faster pace (but still about 50% max effort), complete the step-slide ending in the athletic position.
At the same pace as above, complete 2 sequences in a row. Shuffle-shuffle-stop. The athlete should stop in the athletic position.
At the same pace as above, complete 3 sequences in a row. Shuffle-shuffle-shuffle-stop. The athlete should stop in the athletic position.
At a faster pace (75% effort), have the athlete shuffle continuously for 10 yards.
We have now taught the athlete how to move in all directions: forward, backward, and laterally. Now let’s teach them how to decelerate the body!
Deceleration: Slowing the Body Down
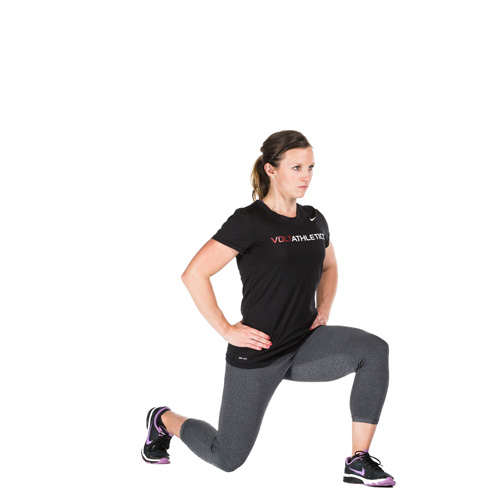
I begin teaching deceleration using the lunge. The forward lunge allows the athlete to decelerate the forward momentum of the body (sprint), and ends with the front leg in the same position when the athlete decelerates from a forward run. The same can be said with the backward and side lunge for their respective locomotor movements.
Although we spend considerable time on speed development or change of direction, we often don’t adequately teach or practice deceleration in a deliberate manner. Similar to my approach with teaching the jump, I progress athletes incrementally from slow to maximal effort when decelerating.
Key Coaching Points for Deceleration:
Shorten the stride for a few steps before stopping. Use a short and choppy, pitter-patter step pattern.
When beginning the deceleration, there is a slight backward body lean, which is opposite to that of acceleration and sprinting.
The arms continue to oppose the movements of the lower body.
As the athlete slows down, the front leg should be in a lunge position, or they can carry through to assume a fundamental athletic position.
I begin by instructing and demonstrating those points, and then have athletes complete repetitions from about 3 yards out from a stopping point. I’ll specify (and alternate) both the starting and stopping foot—this is important; otherwise, the athlete will almost always choose their dominant leg.
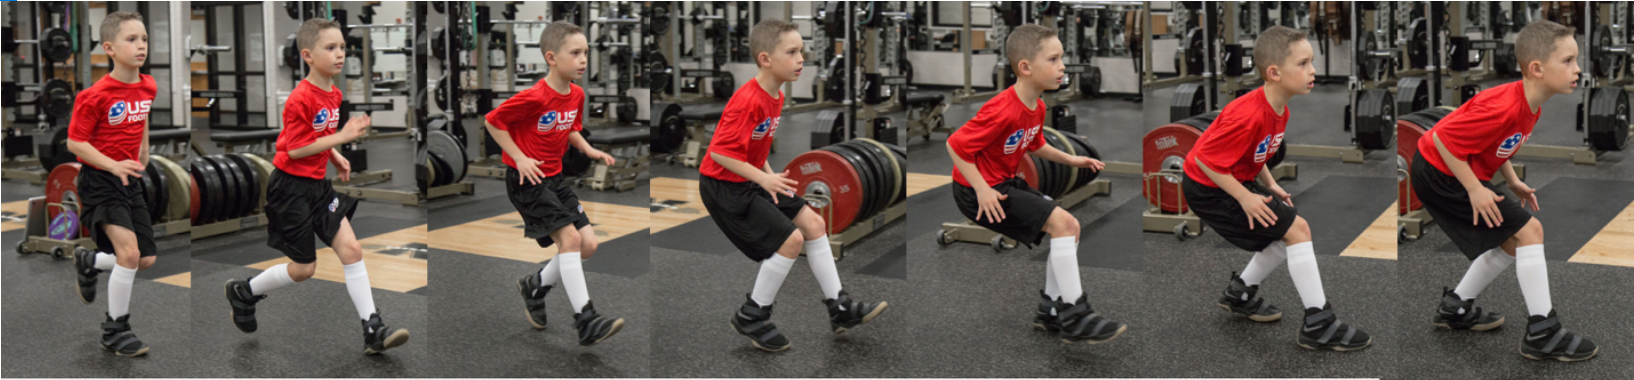
The phases of deceleration.
After the completion of each rep, I’ll have the athlete freeze in the final position so that they can see and feel the appropriate position and the coach can also make any necessary adjustments. The athlete should lower their center of mass and also keep their nose above the toes. Similar to the backpedal—as the nose goes, so goes the body. That is, if the nose goes substantially beyond the toes when decelerating forward, the athlete will most likely lose balance. The athlete should end in a similar position on the front leg as described above for the forward lunge.
As the athlete gains competency, I’ll move them back to 5 yards, and then 10 yards, still performing the drills at about 25-50% effort. From here, intensity of effort will be progressively increased from 50% to 75% to near-maximal effort.
Change of Direction

The traditional four-cone drill. Set up 4 cones in a 5-yd x 5-yd square. Starting at the lower left cone, sprint forward 5 yards, shuffle right, backpedal, then shuffle left back to the starting cone.
Now that we have covered the traditional fundamental locomotor patterns of the forward run, backpedal, and lateral shuffle, along with deceleration, we can begin incorporating them into simple change of direction (COD) drills (which we can then progress to complex COD drills, and ultimately to reactive agility drills). I will first begin with simple transitions from forward to backward, backward to forward, forward to shuffle right, forward to shuffle left, backward to shuffle right, etc., and then combine into more complex patterns starting with the traditional four-cone drill (see above).
As mentioned above, it’s important to specify the deceleration and plant leg for COD drills. I’ll go as far as to specify which leg athlete should use as their drive or push-off leg. Another important consideration is planting and cutting and using the plant leg for leverage to drive and accelerate in the direction of the next movement.
A few points on these simple COD drills. I’ll start with the forward-to-backward pattern (5 yards forward/backward), making sure the athlete plants and drives going into the backpedal, and upon decelerating in the backpedal that they finish in the lunge position. During the forward-to-shuffle pattern, I’ll have the athlete stop and pause in the fundamental athletic position following the shuffle. In performing these simple COD drills, have the athlete perform the first few at a slow speed, progressing to near-maximal effort. And, as always, there should be an emphasis on quality movement.
When progressing to the four-cone or four-box drill, make sure that the athlete is coming to a stop at the end of the drill (near the start line), so they don’t run into the next person in line. This also allows for another opportunity to focus on decelerating and getting into the athletic position.
Another COD drill I often use is the zigzag drill. I start with basic locomotor movements of forward, backward, and lateral shuffle, and then add transitional combinations as outline in the four-cone drill above (e.g., forward-to-backward, forward-to-shuffle, etc.). It’s important to note that not all COD drills require stopping and cutting. The zigzag drill can also be used with a cornering or curvilinear maneuver as well.
And one final common agility drill is the agility wheel (see below). The specific movements can be altered, as can the number of points in the wheel. For example, a simple “iron cross” can be performed (this can also be used in reactive agility drills by calling out the numbers athletes should be moving toward).

To introduce “reactive” drills that help hone an athlete’s ability to react quickly to game-speed decisions, you can call out the numbers you want athletes to run to each rep.
Carioca
Although not seen as a fundamental movement skill, the carioca is a staple in warm-ups. This can be another challenging skill for young athletes. Again, it’s important to start slow and learn the footwork before progressing the tempo. Starting from the fundamental athletic position (of course), my coaching cue is “left foot in front, left foot behind” as athletes move to the right. The hips should swivel slightly, but remain facing forward. I begin with a low-knee version and progress to a high-knee carioca
Most individuals don’t recognize that he carioca serves to train the crossover step with the action of the hips and the foot. To emphasize this point, one can transition from the carioca to the forward run.
Incorporating these Skills into a Dynamic Warm-up
The movement skills can be incorporated into a dynamic warm-up. I will typically line athletes up, with no more than 4-5 athletes per line. I’ll also place a cone about 5 yards out, as the indicator for when the next athletes goes, or I’ll give a command. This allows me to coach the athletes in a line, rather than all of them moving at one time.
I also run the warm-up with an up-tempo pace, to gain the physiological advantages of a faster pace (increased blood flow, core body temperature, etc.). Of course, this is also dependent on the movement skill proficiency of the group. I’ll also note that the dynamic warm-up needs to be coached, just like any other segment of practice. Too often athletes are left on their own during this segment, with a result of “going through the motions” instead of working toward positive changes.
Here is a sample dynamic warm-up that I have run with athletes:
Forward run
Skip
Knee pull to chest (single-leg balance)
Heel to butt
Lunge with trunk rotation
Marching tin soldiers (kicking action)
Walking single-leg RDL
Backpedal
Shuffle with arm swing above head
Shuffle-shuffle-groin stretch (teaches lateral deceleration)
Low-knee carioca
High-knee carioca
Shuffle-shuffle-forward (50% effort, then 75% effort)
Zigzag runs
The warm-up doesn’t always need to be executed in a straight line or in a forward direction. I have incorporated a curvilinear pattern with transitions every 5 or 10 yards (forward to right lateral to backward to left lateral) for the same movement. This provides variation, which can impact engagement (reducing boredom/monotony), as well as variation in the mechanical stress patterns placed on the body.
Obstacle Courses
Another creative way, especially for younger athletes, to incorporate fundamental movement skills into warm-ups and practice sessions is to construct an obstacle course. Jeremy Frisch provides several excellent videos on the use of obstacle courses for fundamental movement skill acquisition.
The Takeaway
Coaching athletes on the proper technique required to move from point A to B safely, efficiently, and with speed will only pay off on the field/court/etc. Incorporating them into your dynamic warm-up before practice is a great way to get in quality reps while preparing the body for the tasks ahead. Improving an athlete’s movement quality in fundamental skills like running, hopping, and zig-zagging will help them build a foundation of solid technique—which they’ll be able to fall back on during game scenarios when fatigue hits.
Join hundreds of thousands of coaches and athletes using Volt's intelligent training system. For more information, click here.
Learn more about Dr. Eisenmann | @Joe_Eisenmann