Foam Rolling II: Slow Your Roll!
/
You are hereby cordially invited to a party in your living room. Or gym. Or office. Or bathroom — hey, I won’t judge! This is a party built for two — you and your trusty foam roller — and THIS PARTY DON’T STOP. It takes place any (and everywhere) you and your foam roller attack the yucky collagen fibers that can inhibit muscle movement and range of motion. (If you haven’t read the prequel to this post, Your Frenemy, the Foam Roller, and would like to throw yourself on a knowledge grenade, be my guest. I’ll wait patiently. Back so soon? WONDERFUL!) In my first article on foam rolling here on the Volt Sports Performance Blog, I addressed the WHAT and WHY of rolling on a cellular level. So now that we've fleshed out the reasons why the foam roller is one of the most important tools to have in your gym/office/bathroom (still not judging!), it’s important talk about the HOW, WHEN, and WHERE of foam rolling.
So if you’re out there thinking, “Christye! I have overcome my hatred for the foam roller! We’re BFFs now! We are literally snuggling and watching reruns of Psych on Netflix right now! We’ve emotionally connected! But…how the heck do I use this dumb piece of foam?” Well, this one’s for you. In fact, I’ll consider that your RSVP — so let’s get this party started!
HOW TO ROLL

This may seem fairly self-explanatory — “um, you just…roll on it, bro” — but there is more to foam-rolling than, well, rolling. I usually see two types of foam-rolling going down in the gym: deliberate, purposeful rolling used to improve muscle function and athletic performance...aaaaand what I like to call “sissy rolling.” The sissy-rollers are easy to spot — they’re the ones gently flailing around on the foam roller for a few seconds before or after a workout, halfheartedly brushing past their quads, not a single pain-tear rolling down their ignorant cheeks. These people are doing it wrong.
I’m kidding, I’m kidding…kinda. If you are not going to spend the necessary time and effort required in foam rolling, you may as well give your roller to your buddy Steve. You will not do your body any good. You are uninvited to the party.
The message here is this: foam rolling requires patience, persistence, and proper technique. The 3 P’s of rolling! (What a great children’s book that shall make.) Grazing your quads once a week is not going to make a difference in their functionality. What WILL do the trick is moving your body weight across the roller in a slow, controlled manner.
Foam rolling should take you a chunk of time — ideally 10-20 minutes per day. That sounds like a lot…because, frankly, it is! Rome wasn't built in a day, and neither is a mobile athletic body. You've got to invest serious time into your rolling in order to see serious construction on that Colosseum (referencing my Rome analogy, because humor). There are 3 techniques I used while foam rolling in order to make my rolling time as productive as possible: 1) slow passes, 2) cross-fiber friction, and 3) contract-relax reps.
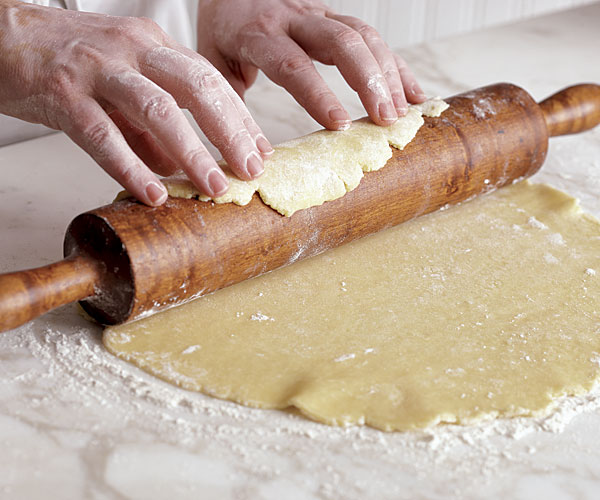
The rolling pin is your foam roller, and the dough is your pulverized quads.
1. Slow passes. Here's where the "slow your roll" comes in. You simply allow the weight of your body to pin a muscle down to the foam roller and slowly roll the length of the muscle — like a rolling pin! To do it right, you need to move slowly, and I mean slooowly — the roller should be moving almost imperceptibly. And if, while you are slooowly rolling, you come across a spot that makes your eyes pop out of your head in pain, STAY THERE. That’s right — sit on That Spot for 30-60 seconds, or until you feel a change in the muscle. Spending time on one pressure point initiates a neuromuscular reaction within the muscle’s cells, causing a tightening reflex to eventually relax. But that takes time! So spend it. Then, you can pop your eyeballs back in and continue slow-rolling the length of the muscle. Repeat for 2 minutes per muscle, per side.

Nope.
Yep.
2. Cross-fiber friction. Muscle fibers run in one direction (not the British boy-pop sensation) down the entire length of each muscle, kind of like the strings of a violin. And sometimes, it’s necessary to create some movement against the grain of the muscle fibers in order to make changes — like a bow moving perpendicularly across violin strings. To accomplish this while rolling, begin by slowing rolling the length of a muscle. Then, when you reach a Spot, move your body against the roller in the opposite direction of your muscle fibers. By using your body weight against the roller to “strum” against the muscle fibers, you help break up those nasty collagen fibers that form in on a weak or injured spot in the muscle. Since that collagen is “thatched” in all directions on your muscle, and not just in the same direction as your muscle fibers, using cross-fiber friction is an effective way to help restore full range of motion to your muscles. Try 4-10 side-to-side “strums” per Spot.
3. Contract-relax. This technique requires Jedi mind strength, and a sound-proof room so you can say all your swears without offending somebody. Begin by slowly rolling the length of a muscle (seeing a pattern, here?). When you find an especially horrible Spot of terribleness, contract your muscle for 3-10 seconds on that Spot. Then, bite down on a leather belt and RELAX the muscle for another 3-10 seconds. By contracting the muscle, you are effecting a neuromuscular response that tells the muscle to passively relax. Then, by actively relaxing that muscle, you allow greater pressure from the foam roller to penetrate the muscle. (Yeah, yeah, I know I said “penetrate” — it couldn’t be helped.) It’s kind of like your muscle senses itself contracting and thinks, “Oh, I’m safe from the horrible pain caused by relaxing!” and relaxes. Like neuromuscular reverse psychology. (Another great children’s book idea.) Repeat 3-10 times per Spot, and marvel at the magical properties of your own muscles.
WHEN TO ROLL
The perfect answer? All the ding-dang time. The practical answer? Whenever you can. The über-practical answer? (And yes, I DID just use a colloquial umlaut in a post — take that, Coach Jace!) When it will make the biggest difference to your athletic performance.
Foam rolling is a type of self-myofascial release, a shmancy term for self-massage. This means that it helps immediately restore function to muscles that are inhibited by tightness, pressure, and “knots.” So if you’re about to try for a PR in your back squat, and you know your quads tend to be your limiting factor in reaching maximum weight, it might be a good idea to do a quick rolling session before you lift. This way, you’ll clear your muscles of any restrictions that might otherwise hinder your performance. Translate this to game day, and rolling your lats before a distance swimming event, or calves before a cross-country race, will help prime your muscles for optimum performance. As an added bonus, it will get you actively thinking about those specific muscles during your athletic event, making it easier to activate them properly.
HOWEVER — and this is an important caveat — it might not be the best idea to spend 45 minutes sitting on the foam roller before a football game. Why? If you’ve ever had a deep-tissue massage, you’ll know that you can be pretty darn sore afterward. (If you have delicate peach-skin like me, you may even bruise!) And probably the last thing you want to do when you’re sore to the touch is try to tackle a fullback with a head of steam. So there is an element of strategic balance that comes with rolling for athletic performance: roll too little and your body may be restricted on game day, but roll too much before game day and your body may be too sore to perform its best. What a Catch-22!
This is why I recommend doing your “serious” rolling — I’m talking a foam-rolling SESSION — on a rest or recovery day from your sport. Then, save the performance-specific areas for a quick pre-game warm-up. This way, you can address the general issues that tend to plague your body all the time on days when your performance won’t be affected by muscle soreness, and “touch up” the muscles needed for optimum performance on game day. On my rest days, I roll my whole body for 20+ minutes, focusing on the places that are usually tight or hindered on me (my right quad and glutes). Then, when I’m preparing for a day of heavy overhead loading, I’ll roll my lats — spending no more than 2 mins per side — as part of my warm-up.
In other words, be smart! use foam rolling as a tool to help you achieve your athletic performance goals. (Even if those goals are as simple as counteracting the postural damage of sitting in front of a computer all day — foam rolling can help it all!)
WHERE TO ROLL
This brings us to our last point: where on earth to roll your muscles. You can pretty much roll any muscle you choose (although I might stay away from your face…that just sounds like a weird form of punishment), but HERE ARE MY TOP 5 FAVORITE SPOTS to hit with the roller. I have found that consistently addressing these areas has helped improve my squat depth, overhead extension, sitting posture, and knee pain while running.

Her hair masks her sweet, sweet pain.
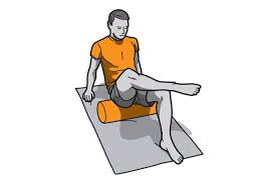
1. QUADS. There’s a reason they call Coach Jace and me “quad donkeys” — we are well-endowed in the hip-flexor/knee-extensor department. As a result, my quads are often gummy and restricted from constant use. See if yours are as gross as mine! First, do some bodyweight squats to get a sense of how your quads feel before rolling. Then, spend 2-5 minutes rolling each leg, focusing on the middle, outer, and inner portions of the quad muscles. Use cross-fiber friction or contract/relax to tackle any Spots of Darkness. Afterward — or, even better, before rolling the second leg — do some more squats. Your rolled quad will be full of sunshine and rainbows, while your unrolled one will reside in the depths of Mordor. Repeat on both sides and enjoy your new squat PR! Seriously, I cannot stress the importance of this exercise enough (and yes, I am calling it an exercise because it makes THAT MUCH of a difference to your body). Many of my clients have incorporated quad foam-rolling into their exercise regimen, and have had their knee and IT-band pain suddenly disappear. After very few sessions. It's amazing what your body can do when it is freed up to move correctly!
(Also: there is a lot of research being done about whether rolling your IT-band is beneficial. Your IT-band is a tendon, which doesn't get a lot of blood flow, so rolling it will HURT LIKE A YOU-KNOW-WHAT. And, since it isn't a muscle, foam-rolling it will not change its length or suppleness. My conclusion? Stick to rolling your muscles. If your IT-band is especially tight, spend more time rolling your TFL (tensor fascia latae) muscle at the top of your hip. That's the muscular portion of the IT-band, and rolling the TFL should help your IT-band feel looser.)
Be sure to roll into the opened, externally rotated glute.
2. GLUTES. If you aren’t using your glutes enough, Coach Jace will come to your home and make you strap on a weight vest and squat full-depth 'till your legs fall off, or until he is satisfied, whichever comes first (guess which will come first). Then, you can roll them! You’ve got the glamorous gluteus maximus to contend with, but you’ve also got a slew of deep external rotators that do a lot of thankless work in movements that involve your hips and legs (which is…basically all movements). So, to access those deep rotators, cross one ankle over the opposite knee, exposing that glute to the maximum surface area of the foam roller. And that sweet, sweet pain. Contract-relax works particularly well on these areas. Spend 2 mins on each delicious glute.

This gal doesn't want you to see her tears.
3. LATS. Your latissimus dorsi is the biggest muscle of your back, and responsible for many of the body’s pulling movements. To access the insertion point of the muscle, lie on your side with the foam roller situated to the side of your ribcage, beneath your scapula, with your arm extended above your head. Then, weeping softly from the excruciating goodness, slowly roll up towards your armpit. If you’re feeling masochistic, try some cross-fiber friction by moving your arm back and forth. After you’ve rolled one side, try extending your arms overhead — the freshly-rolled one will feel as if it may just fly off towards the heavens, while your yet-to-be-rolled arm will feel like a big ol’ piece of garbage.
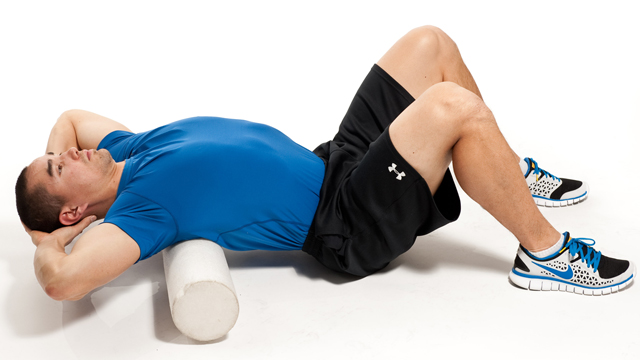
4. T-SPINE. If you have ever sat at a desk for longer than 10 minutes at a time, you need this exercise. Our culture tends to spend an awful long time hunched over our desks, or phones, or iPads, or laptops writing blog posts…ahem, and all that hunchy-time isn’t doing us any favors. Spending too much time with your back curved and shoulders hunched and internally rotated leaves our pectorals chronically short, and the muscles of our upper back (thoracic spine region) overstretched and petrified. Not, like, afraid…just kinda stuck. This exercise is CRUCIAL for restoring flexibility and movement to our T-spine area, which translates to better positioning for any pressing or pulling motion. Test it this way: grab a pair of dumbbells and perform a standing overhead press. Stand sideways in front of a mirror, or have a friend watch you, and notice where your arms travel as they extend upward. Then, roll your T-spine. Beginning from the base of your ribcage, and keeping your butt firmly planted on the ground, extending your body backward over the foam roller. It’s important to keep your abdominals tight during this exercise, so that the movement initiates at the T-spine instead of your lower back. Think of the spot where the foam roller meets your back as the fulcrum of the movement, and try to hinge backward from that spot only. You may only be able to bend a few inches—or none at all. Do 3-5 reps, and then inch the foam roller up your ribcage a notch, repeating this movement until you reach the base of your neck (the end of your thoracic spine). Then, retest that overhead dumbbell press. I GUARANTEE you: the movement will feel — and look — more stable. More mobility in your spine and muscles translates to more stability during exercise and movement, which means you can develop greater strength and power. THANK YOU, FOAM ROLLER!

Happiness is supple pecs.
5. CHEST. OK, this one’s kind of misleading— while you can physically roll your pectoral muscles (for some genders this may be more uncomfortable than for others), I like to use my foam roller to stretch and release my chest and anterior shoulders without, um, smushing myself. Lie on your back with the foam roller lengthwise down your spine. Either keep your head supported by the roller, or gently allow it to stretch backward to the floor (releasing the front of your neck). From here, pretend that you’re making a snow angel: trace an arc with your arms, palms facing up, as far up as you can manage while keeping your knuckles on the ground. If your hands do not touch the ground, CONGRATULATIONS — your chest is extremely tight. Spend 2-5 minutes here making foam angels, allowing your chest muscles to relax and open. After you are done, you will feel like a literal angel. No halo required.
THE TAKEAWAY
If you glean nothing else from this post, READ THIS! Here is a succinct bulleted list of takeaway points about foam rolling, from me to you:
Remember the 3 P's: Patience, Persistence, and Proper technique
Most important rolling rule: SLOW DOWN
Sit on Spots of muscle tension for 30+ seconds, or until you feel a change in the muscle
Roll purposefully on recovery days; roll lightly on high-activity days
Roll everything
If you don't have time to roll everything, tackle your quads and T-spine
But roll everything
Except maybe your face
And there you have it! As always, leave me a comment with any rolling-related questions you may have. And remember: this party is portable, so strap that roller to your back and never have restricted muscle movements again!!!!!
Join over 100,000 coaches and athletes using Volt's intelligent training app. For more information, click here.
Learn more about Christye and read her other posts | @CoachChristye